Wednesday, April 27, 2011

How to configure Outlook with OFFICE-2007


How to configure Microsoft Outlook to check your e-mails?


  • Start Microsoft Outlook 2007. When the Startup Wizard displays, click Next.

NOTE: If the Startup Wizard doesn't automatically display, from the Tools menu, select Account Settings, and then click New. In the Add New E-mail Account dialog box, select Microsoft Exchange, POP3, IMAP, or HTTP, then click Next.


  •  On the Account Configuration page, select Yes to indicate you want to configure an email account, and then click Next.


  •  At the bottom of the page, select Manually configure server settings or additional server types, and then click Next.  


  • On the Choose E-mail Service page, select Internet E-mail, and then click Next.
  •   On the Internet E-mail Settings page, enter your email account information as follows:  
       Your Name 
       Your first and last name. 
      
       E-mail Address 
       Your email address. 
       
       Account Type
       IMAP - IMAP 
      POP - POP3 

       Incoming mail server 
      The information you noted from Web-Based Email. 
     
     Outgoing mail server (SMTP) 
     The information you noted from Web-Based Email. 
     
     User Name 
     Your full email address. 
     
     Passwor.
     Your email account password.
  • Select Remember Password, and then click More Settings

  • In the Internet E-mail Settings window, click the Outgoing Server tab. Select My outgoing server (SMTP) requires authentication, and then select Use same settings as my incoming mail server.


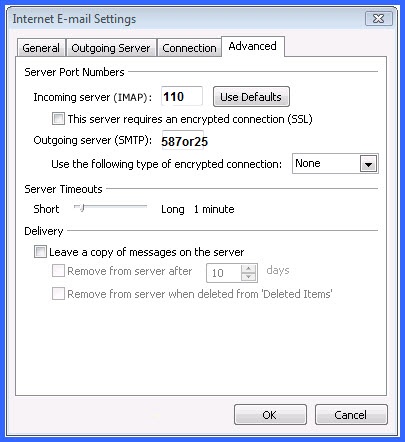
  •  Click the Advanced tab. 
        Incoming Server Settings
           Port
              IMAP without SSL - 143
              IMAP with SSL - 993
              POP without SSL - 110
              For POP with SSL - 995
        (Optional) This server requires an encrypted connection (SSL)
              Select to enable.
              Outgoing Server Settings
           Port
               Without SSL - One of the following: 25, 80, 3535, 587
               With SSL - 465
           (Optional) This server requires an encrypted connection (SSL)
           Select to enable.
           Click ok.


  •  Click Test Account Settings. Outlook will send itself a message to test your incoming and outgoing capabilities. Once this is complete, click Next.


  •  Click Finish.


Monday, April 25, 2011

Another way to hide files and folders in Windows XP

Here’s how you can create a hidden folder in Windows for free that’s pretty secure:
1. Go to Start, Run and then type in CMD to open the command prompt window
hidden folder


2. Now navigate to the parent folder of the folder you want to hide. If you want to hide a file, navigate to the folder where the file is located. For example, I want to hide a file in C:\Test, so I would type in the following:
CD C:\Test

locked folder

3. Now type in the following command, replacing the word filename with the name of the file you want to hide.

attrib filename +s +h

And that’s it! Your file or folder is now completely hidden! It won’t show up in My Computer, it won’t show up if you browse via the command prompt and it won’t even show up if you select “Show all Hidden Files and Folders”.
If you want to un-hide the folder you simple follow the same steps, expect now you’ll run this command:

attrib filename -s -h

You can use this command for both files and for folders. In our example, if I wanted to hide C:\Test, I would go one level above to C:\ and then type in attrib Test +s +h.
hide files
You’ll definitely need to remember which folders or files you have hidden as there is no easy way of determining what’s missing, so make sure you remember what you hide!


How to create a secured and locked folder in Windows XP

It basically involves using a script to morph the folder into something completely different so that it’s still visible, but nothing inside the folder is accessible. In order to view the data, you have to run another script to morph it back. Anyone who clicks on the folder will be brought to the Control Panel and simply think it is a shortcut.

Here are the steps to create the protected folder in Windows XP:
  • First create a folder that you will use to store your confidential data. For example, I have created a folder called Fonts at the root of my D drive. Since the hidden folder will bring you to the Control Panel, it’s best to name the folder as one of the programs inside there.


  • In the same location where you created the new folder, create a new file in Notepad, copy the following below into it, replace Fonts with the name of your folder and save it as loc.bat.
ren Fonts Fonts.{21EC2020-3AEA-1069-A2DD-08002B30309D}
  • To save the file as a .bat file in Notepad, just put the whole thing in quotes, like “loc.bat” and then click Save.
                hiddenfolder


  • Now you should have a bat file named loc in the same directory as your Fonts folder, not inside the Fonts folder.


  •                    lockedfolders1
    • Create another NotePad file and type in the following listed below and save it as “key.bat”.
    ren Fonts.{21EC2020-3AEA-1069-A2DD-08002B30309D} Fonts
    • Now you’ll have loc.bat and key.bat along with your folder. Go ahead and double-click on loc.bat and your folder will turn into the Control Panel and nothing inside can be viewed. Clicking on it will simply bring you to the Control Panel. You’ll notice the icon should have changed also.
                   protectedfolders

    • To view the data inside your folder again, click on key.bat and your folder will return to normal! Pretty simple!
    Of course, keeping the key.bat file in the same folder will defeat the purpose of securing the folder, so it’s best to move the key.bat file somewhere else, or even better, put it on a USB stick or CD that only you can access.
    Most people will be probably look at the folder and simply ignore it since it has the control panel icon and it links directly there. Of course, if someone knows this trick also, they can create their own key.bat file, etc and open it back up. However, if you’re dealing with someone who can do all of that, it’s best you check out more advanced 3rd party software to lock down a folder.

    ALTERNATIVE METHOD:
    If you’re having trouble with the above-mentioned method (from what I can see from the comments, a good number of people), then here’s another quick and free way to create a secure folder in Windows XP. There is a very nice program called Free Hide Folder from Cleanersoft that allows you to easily hide your private folders.
    Your folders are completely hidden and you must supply a password to open the program to unhide the folders. The personal edition is free, just click the Skip Registration button unless you’re using it for commercial purposes.

    free hide folder

    I’ve tried this program myself and I cannot access the hidden folder via Windows Explorer nor the command prompt. So if the above method is not working, give this a shot!


    Sunday, April 24, 2011

    Remove Write Protection On USB Pen Drive or Memory Card or iPod

    In the past we had received so many problems from the readers who have a problem in copying files on their USB portable devices like pen drives, memory card and iPod etc.


     According to the mails we had received about this problem, people have seen the following errors when their thumbs drives, memory card etc becomes write protected.

    • Cannot copy files and folders, drive is write protected
    • Cannot format the drive, drive is write protected
    • The disk is write protected
    • Remove write protection or use another disk
    • Media is write protected
    Some times people say that suddenly their drive become write protected and they are not able to delete any files and folder on the drive and also not able to copy new files and folder to USB portable drive.
    Let’s see how can you remove write protection on your portable devices like pen drives, memory cards, iPod and other USB mass storage devices.

    Fix:
    Write Protection on any portable USB Device can be applied by the physical lock provided on the card adjuster or some times provided on the pen drives, so make sure to make your drive not write protected by moving the lock in right direction.
    But even after moving the physical lock for write protection the problem can happen due to some virus action. This happens when some virus or script which applies the registry hack to make any drive write protect when connected to the computer, In that case follow the procedure below to remove write protection from your pen drive.

    1. Open Start Menu >> Run, type regedit and press Enter, this will open the registry editor.

    2. Navigate to the following path:

    HKEY_LOCAL_MACHINE\SYSTEM\CurrentControlSet\Control\StorageDevicePolicies

    Note: If the registry key StorageDevicePolicies key does not exist, you will need to create it
    Download this batch file called add.bat from here, and double click after download the key will be automatically added to registry.


     3. Double click the key WriteProtect in the right pane and set the value to 0 in the Value Data Box and press OK button


     4. Exit Registry, restart your computer and then again re-connect your USB pen drive on your computer. That is it, done.

    After a lot of user comments telling that the above method does not work for them, we tell you another method which you can follow to solve the “Pen Drive is Write Protected” problem.
    If the above method does not work for you, follow the below steps:
    1. Copy all the important data from this drive to your computer because this method will format the drive and erase all the data on the pen drive.
    2. Now download the Apacer Formatting Utility, Unzip this utility to a folder on your hard disk, preferably on a folder on desktop screen for easy access (Do Not Try To Save it on pen drive). Keep your pen drive plugged in, and double click on the Start.bat file in the folder where you unzipped the above utility. This will start formatting your pen drive, wait till the formatting completes and the LED on your pen drive stops blinking. Remove your pen drive after than and plug it in again.
    The above two steps will solve the problem. If you still face the problem, follow the below steps:
    1. Goto Start > Run, type cmd and press enter, this will open command prompt.
    2. Type the following command on the command prompt replacing X with the drive letter of your pen drive.
    CHKDSK X: /F
    The above two methods will help you fix the problem.


    Saturday, April 23, 2011

    Find Out Who Is Using Your Wireless Network Connection For Free

      So you have a wireless network connection at home but is quite slow for some days? There are so many ways to hack inside the wireless network router that anybody could be using your connection without permission. So how would you know if someone is using your wireless network connection?

    Even if you are not a Windows network expert, you can now still find out whether someone is using your connection or not. Zamzom Wireless Network Tool is a free utility that can do a quick scan for you. Just load it up, hit Fast Scan and it will show you the IP and MAC addresses of every computer that is connected to your WAN.
    zamzom wireless network screenshot
    You can also perform a Deep Scan, but a Fast Scan will be enough for most users. It can also show the name of the computer that is connected but you will have to upgrade to Pro version(which will cost some bucks). You don’t need to know the name of the computer, since you can block the IP address easily through your router.

    http://www.zamzom.com/

     It works on Windows 2000, Windows XP, Windows 2003/2008 Server, Windows Vista, and Windows 7. Enjoy!

    Create A Quick Ad Hoc Wireless Network Connection Between Two Computers In Windows 7/Vista

    Do you want to create a quick network connection between two computers or laptops to share some files? Or maybe you want to share an internet connection? Windows 7 and Vista have a build-in feature to create a quick ad hoc wireless network connection, this means you can connect directly with another computer or laptop without the need of a router.


    To begin, click Start and select Network. Now click on Network And Sharing Center as shown in the screenshot below. If you can’t find Network, then type Network in Start Search and hit Enter.

    Now in the left sidebar, click Set Up A Connection Or Network. From the list select Set Up A Wireless Ad Hoc(Computer-To-Computer) Network option and click Next


    Click Next again and it will ask you to type a Network name and select the Security settings as shown in the screenshot below.


     Make sure you select a good password, if you don’t know which security type to select, click on Help Me Choose link next to it. After you are done click Next and the Network connection will be ready.

    Now in the Network And Sharing Center you can choose what to share as you can see from the screenshot below.


     To Share an Internet Connection, click View Status next to the connection that you want to share. Now click on Properties button which you will find under Activity.

    Click on the Sharing tab and tick the checkbox where it says Allow Other Network Computers To Connect Through This Computer’s Internet Connection. Under Home Networking Connection select Wireless network Connection and click OK.


     Now your connection is ready to to shared. To enable the wireless network connection you just made, go to Start and click Connect To.


      You will see your wireless connection listed there. Select your connection and click Connect.


     You will see a success message as shown below.


     You will see your connection listed under Wireless Network Connection on the other computer. Simply connect from there and you are done sharing the internet connection.

    Note: To connect successfully make sure the wireless hardware is enabled on both computers or laptops.


    Thursday, April 21, 2011

    Disable Windows Mobility Center in Windows 7 or Vista

    Windows Mobility Center is a fairly useful tool for those of us using Windows 7 or Vista on a laptop computer, but might not be for everybody, especially since it takes over the Win+X keyboard shortcut.
    If you would rather disable Windows Mobility Center, all it takes is a single registry tweak.


    Manual Registry Tweak
    Open up regedit.exe through the start menu search box and then navigate to the following key, creating it if it doesn’t exist:
    HKEY_CURRENT_USER\Software\Microsoft\Windows\CurrentVersion\Policies\MobilityCenter


    Now create a new 32-bit DWORD entry in the right-hand pane called NoMobilityCenter and give it a value of 1.

    Disable "Your computer might be at risk" Popup in Windows XP SP2

    Since upgrading to XP SP2 a long time ago, I constantly get nagged by a popup message that tells me my computer might be at risk because I don’t have an antivirus software installed. Here’s how to turn off that annoying message.
    Note: You should probably have antivirus software installed.


    You will want to open up your control panel, and then open the Security Center icon.

    On the left hand side of the security center window, you will see a resources section. Click the bottom link, “Change the way Security Center alerts me”


    You can choose which alert to disable here. Since I don’t have antivirus software, I unchecked the bottom checkbox.

    Tuesday, April 19, 2011

    How to Prevent Users from Changing Desktop Wallpaper in Windows?

    If you run a company, you might want to set your company logo or any particular wallpaper on all of your users' desktops. On the other hand, if you use a single system you might still want to have your desired wallpaper on Desktop and it really annoys when someone changes the wallpaper.
    So if you are tired from people changing the wallpaper and want to prevent users from changing it everyday, then this tutorial will help you.
    In this tutorial, you'll learn a way to set your desired wallpaper on Desktop and no one will be able to change it neither from Desktop Properties nor by right-clicking on an image and select "Set as Desktop Background".

    So here we start our tutorial:
    1. Type regedit in RUN dialog box or Startmenu Search box and press Enter. It'll open registry Editor.
    2. Now go to following key:

    HKEY_CURRENT_USER\Software\Microsoft\Windows\CurrentVersion\Policies

    3. Under "Policies" key, create a new key "System". It might already exist in some systems.
    4. Now select "System" key and in right-side pane, create a new STRING value Wallpaper and set its value to the exact path of your desired wallpaper. You can use .JPG and .BMP files in this method.
    e.g. if your wallpaper exists in "E:\Wallpapers\Wall1.JPG", then set the same path as value of "Wallpaper".
    5. You can also set the wallpaper style e.g. Centered, Tiled or Stretched. Create a new STRING value WallpaperStyle and set its value to as following:
    • 0 (Centered)
    • 1 (Tiled)
    • 2 (Stretched)


    6. That's it. Now restart or log off your system and no one will be able to change the wallpaper.

    Restricting window features through registry editor

    1. Click Start → Run and type regedit.
    2. Scroll Down to following registry keys-
    [HKEY_CURRENT_USER\Software\Microsoft\Windows\CurrentVersion\Policies\Explorer]
    See some good restriction on windows *** No Shutdown button!!! 
    

    If the particular link or path is missing you can create the key for the same name for example if Explorer doesn’t exists in Policies, so you should create a new key (right click on blank space in Policies and type Explorer to create a new key. Please see previous article on blocking view on specific drive where method for creation of DWORD value name and data is clearly defined).
    3. Create a DWORD “AS STATED BELOW ” and set the value to restrict:-
    (Right click in the blank space of Explorer key and Create a new DWord. Rename the DWord as “AS STATED BELOW ”.


    4.          Within the above key type the DWORD for respective functions (Keep in mind that the value of DWord should be 1 for activating these features and 0 for disabling them.)


    DWord Value name
    Function menu (DWORD value data  = 1(Y) or =0 (N)
    NoFindDisable/ hide find menu
    NoDrivesHide drive through My Computer
    NoRecentDocsHistoryPrevent documents from adding to the list
    ClearRecentDocsOnExitClear recent doc on exit of Windows
    NoNetworkConnectionsDisable / hide
    NoSMHelpDisable Start Menu Help
    NoSMMyDocsDisable/ Hide My Documents
    NoToolbarsOnTaskbarAs Mentioned in Dword Value
    NoTrayItemsDisplayAs Mentioned in Dword Value
    HideClockAs Mentioned in Dword Value
    NoSetFoldersAll settings of Folders
    NoSetTaskbarRemoves Taskbar system folder from the settings option on the start Menu
    No DesktopRemoves everything from the Desktop
    NoCloseDisables Shutdown
    NoSaveSettingsPrevent changes of Desktop Settings
    DisableRegistryTool“regedit.exe will not work” Please avoid this.

    5. Restart.

    Similarly, small restrictions on System and network can also be applied:-

    6.          Scroll Down to following registry keys (System Related) :-

    [HKEY_CURRENT_USER\Software\Microsoft\Windows\CurrentVersion\Policies\explorer]

    DWord Value nameFunction (DWORD value data = 1(Y) or =0 (N)
    NoControlPanelHides the Control Panel
    NoDispBackgroundPageHides the Background Page
    NoDispScrsavPageHides the Screen Saver Page
    NoDispAppearencePageHides the Appearance Page
    NoDispSettingsPageHides the Setting Page
    NoSecCPLHides Security Page in Control Panel
    NoPwdPageHides Password Page
    NoAdminPageHides Remote Administration Page
    NoProfilepageHides User Profile Page
    NoDevMgrPageHides Device Manager Page
    NoConfigPageHides Hardware Profiles page
    NoFileSysPageHides File System Button
    NoVirtMemPageHides Virtual Memory Page
    DisableRegistryToolRestrict on editing of Windows registry


    7.     Scroll Down to following registry keys (Network Related):-

    [HKEY_LOCAL_MACHINE\Software\Microsoft\Windows\CurrentVersion\Policies\Network]


    DWord Value nameFunction (DWORD value data= 1(Y) or =0 (N)
    NoNetSetupSecurityPageHides the Network Security Page
    NoNetSetupHides the Network option in the control panel
    NoNetSetupIDPageHides the Identification Page
    NoFileSharingControlHides the File Sharing Control Page
    NoPrintSharingHides the Print Sharing Page

    8. Restart.

    Improve the browsing speed of your browsers

    Slow browsing can really frustrate the end users. But did you really know that you can increase the browsing speed to a great deal by tweaking your browsers!
    In case you are using Firefox, you probably don’t need to do much because Firefox is already optimized and designed for fast browsing. Still it can improve the speed by a small tweak ;)
    Likewise, the IE6 can also be configured for faster browsing. This is really helpful for users who work on dial up connections.
    You don’t have to be a genius to do that. All you need to do is edit some registry values.

    Firefox users:
    1) In Firefox address bar write about:config and hit OK
    –> It will give you a warning! But you can proceed from here…
    2) Search for click network.http.pipelining. Set the value to ‘true’
    3) Search for network.http.pipelining.maxrequests and set value to 10. Default should be 4.
    4) Now create a new string (right click and you will get the option) nglayout.initialpaint.delay and set its value to 0
    That’s all. Restart your browser and enjoy the new speed.

    IE users:
    IE users need to edit they registry values. To do so:
    1) Go to Start –> Run and type regedit
    2) Select HKEY_CURRENT_USER –> Software –> Microsoft –> Windows –> Current Version –> Internet Settings
    Change the values (DECIMAL) to 10 and save.
    You are done. Restart the browser and enjoy.

    Monday, April 18, 2011

    Enable The Advanced Performance Setting In Windows Vista

    Now click on Ok button to apply the setting and restart your computer after any changes to go into effect.If you have noticed that the speed of your system is very slow with windows vista then Follow the given steps to configure the advance performance setting in Windows Vista:


    • First of all  logged into your computer with administrative rights.
    • right click on My Computer icon.
    • select the option Manage.
    • small windows will appear with title Computer Management


  • now select the Device Manager option

  • ocate the SATA Disk under the Disk Drives

  • select the enable advanced performance sittings on the SATA disk.


  • Now click on Ok button to apply the setting and restart your computer after any changes to go into effect.


  • Way to clear sensitive information from your computer

    As we Know, during processing, operating system transfers some data and programs from RAM to hard disk and reloads again when required.Operating system spends a lot of time in Paging process, instead of executing the application software. But the problem is that while working you use different software programs on computer and page file may contain your confidential information or stored in non encrypted format. To reduce this risk, you can set your computer to clear out page file automatically each time you shutdown your computer.
    follow steps given below to set your system clear page file automatically-
    1. Logged into your computer with administrative rights.
    2. First click on start button to open control panel
    3. Click here on “Administrative Tools“ option.Go to “Local Security Settings” ,on lift side of this panel click on “Local Policies“.
    4. Click on “Security Options” then double click on “Shutdown: Clear virtual memory pagefile” option.
    5. Now small dialog box will appear with options, “Enabled or Disabled” the page file.
    6. Select the “Enabled”  to set clear page file each time you shutdown computer.
    7. Press Apply button to save settings and then click on Ok to finish.

    Disable the Disk Cleanup Warning

    Sometimes when your hard disk space is full, then windows-xp will pop up a warning and it will recommend to run disk cleanup . Sometimes it is very irritating because the pop-up comes again and again. You can turn off disk clean up  warning with a registry editor. Just do the following:
    Run the Registry Editor
    1. click start->run type regedit (Enter)
    2. select HKEY_CURRENT_USER\Software\Microsoft\Windows\CurrentVersion\Policies\Explorer.
    3. Create a DWORD value called NoLowDiskSpaceChecks and give it a value of 1.
    4. Exit the Registry and reboot

    Please note: It is highly recommend that you do your disk clean up regularity. Otherwise this can slow down your computer performance.

    Enable or Disable Task Manager in Windows

    Task manager comes really handy when your windows hangs! This is your last option to kill the useless processes. But some times some viruses have a capability to disable task manager from windows. In this situation you are not able to end the hanged applications & heavy processes.

    To Enable Task Manager

    Start → Run → gpedit.msc (type) → Administrative Templates → System (double click) → Ctrl+Alt+Del options  → Remove Task Manager →  properties → disable (select) → Ok

    To Disable Task Manager

    Start → Run → gpedit.msc (type) → Administrative Templates → System (double click) → Ctrl+Alt+Del options  → Remove Task Manager →  properties → Enable (select) → Ok.

    restarting PC problem

    Problem of restarting and unforeseen system off issue is occurring in front of many users that can be easily predictable and solved by implementing following steps:

    1. Firstly check windows is properly install or some windows file missing during installation .Some time due to improper shutdown and virus problem is corrupt your file system that may cause missing of file from your hard disk.

    2. Remove processor from motherboard and then after, properly fit processor on motherboard.

    3. Check processor fan that can be properly mounted on processor or not.

    4. Check RAM by replacing it by another RAM having same FSB . Some time this problem is occur due to the compability issue when RAM FSB is not supported by motherboard .So, you can check your motherboard RAM FSB that can be supported by your motherboard or not e.g. 533 ,667,800 MHz FSB and also check capacity of per channel of RAM slot.

    5. If your hard disk produce some noisy sound and hanging problem is occur than change your HDD. Some times bad sectors cause restarting problem.

    6. Some time unforeseen system off is occur due to power supply problem.If, you are performing high processing work than after few minutes your computer is off this shows internal problem of  SMPS and then check it by replacing another SMPS.

    How to Make Your Own Network Cables (Straight-through cables and Crossover cables)

    In Network field, the common hardware we all came across is a patch cord. Here, I have tried to show you a pictorial method for crimping the RJ45 connector with CAT5 cable. UTP Cat 5 cable is used for making connection upto 100m (maximum certifiable length) and giving a throughput ranging from 10Mbps to 1000Mbps. There are two types of UTP Ethernet cables connections made through using pattern – Straight-through and Crossover.

    Straight-through cables


    Use straight-through pattern for the following cabling:
    • Hub to PC or server
    • Switch to router
    • Switch to PC or server
    Crossover cables


    Use crossover pattern for the following cabling:
    • PC to PC
    • Switch to switch
    • Switch to hub
    • Hub to hub
    • Router to router
    • Router to PC

    NTLDR is missing

    The NTLDR is missing error is a common error . This problem is not related with a typical problem. This  happens due to the missing  files. NTLDR (think NT Loader) is the first file that executes during the boot process it can be deleted and corrupted accidentally.
    There are so many causes for this error (NTLDR is missing) like
    • Corrupt NTLDR and/or NTDETECT.COM file.
    • Due to improper shutdown the boot.ini file is corrupted.
    • Hard disk drive is not properly setup in BIOS check the booting device priority that the hard disk is set or not.
    • Computer is booting from a non-bootable source.
    • Faulty or loose IDE / data bus / sata cable (connectivity media between hard disk and motherboard).
    • Failing to enable USB keyboard support in the BIOS.
    • Corrupt boot sector / master boot record.
    • This problem  also occurs When new hard disk is connected to the motherboard  so format it properly and check connectivity media.
    So, you can implement some steps to solve this problem. These steps  are:
    1. Restore NTLDR from the Windows XP Setup CD via the Recovery Console.
    2. At the command prompt, type cd .. and press ENTER.
    3. Enter the letter of your CD-ROM drive like if your Drive having letter g type g: and then press enter it will show prompt g: .
    4. Type cd i386 and press ENTER.
    5. Type copy ntldr c: and press ENTER.
    6. Type copy ntdetect.com c: and press ENTER (Ntdetect.com is another boot file that, when missing, can generate the NTLDR error.)
    7. After this type exit in command prompt and then your computer will restart. 
    copy command:
            copy F:\i386\NTLDR C:\
            copy F:\i386\NTDETECT.COM C:\ 


    note: F is cd Drive letter

      Windows RUN Command Shortcuts

      alc – Calculator
      Cmd – Opens a new Command Window (cmd.exe)
      Charmap – Character Map
      Chkdisk – use to verifying:-
      1. files
      2. indexes
      3. bad sectors
      4. security descriptors
      5. error in volume bitmap

      Cleanmgr – Cleans up hard drives (disk cleanup)
      Clipbrd – Windows Clipboard viewer
      Control – open Control Panel
      Dcomcnfg – component services
      Debug – Assembly language programming tool
      Defrag – Defragmentation tool (*)
      Drwatson – Records programs crash & snapshots
      Dxdiag – DirectX Diagnostic Utility
      Explorer – My document
      Ftp – ftp.exe program
      Hostname – Returns Computer’s name (*)
      Ipconfig – Displays windows IP configuration for all network adapters
      MMC – Microsoft Management Console
      Msconfig – system configuration utility (use to edit startup files )
      Msinfo32 – Microsoft System Information Utility

      Mspaint-Opens’s Microsoft Paint
      Nbtstat – Displays protocol stats. and current connections using NetBios over TCP/IP (*)
      Netstat – Displays all active network connections (*)
      Nslookup- Returns your local DNS server (*)
      Ping – Sends data to a specified host/IP
      Regedit – Registry Editor
      Regsvr32 – register/de-register DLL/OCX/ActiveX
      Regwiz – Reistration wizard
      Sfc – Sytem File Checker
      Sndrec32 – Sound Recorder
      Sndvol32 – Displays Master Volume
      Sysedit – system configuatin editor (autoexec.bat, config.sys, win.ini,system.ini)
      Taskmgr – Task manager
      Telnet – Displays Telnet client

      Tracert – Traces and displays all paths required to reach an internet host (*)
      • symbolize these commands are used inside command mode like c:\ command


      Microsoft Management Console ( msc file extension )
      certmgr.msc – Certificate Manager
      ciadv.msc – Indexing Service
      compmgmt.msc – Computer management
      devmgmt.msc – Device Manager
      dfrg.msc – Defragment
      diskmgmt.msc – Disk Management
      fsmgmt.msc – Shared Folder Management
      eventvwr.msc – Event Viewer
      gpedit.msc – Group Policy
      lusrmgr.msc – Local Users and Groups
      ntmsmgr.msc – Removable Storage
      perfmon.msc – Performance Manager
      secpol.msc – Local Security Policy
      services.msc – System Services
      wmimgmt.msc – Windows Management infrastructure


      Control Panel extension ( cpl file extension )
      access.cpl – Accessibility Options
      hdwwiz.cpl – Add New Hardware Wizard
      appwiz.cpl – Add/remove Programs
      timedate.cpl – Date and Time Properties
      desk.cpl – Display Properties
      inetcpl.cpl – Internet Properties
      joy.cpl – Game controllers
      main.cpl keyboard – Keyboard Properties
      main.cpl – Mouse Properties
      ncpa.cpl – Network Connections
      telephon.cpl – Local Information (Phone and Modem options)
      powercfg.cpl – Power option properties
      intl.cpl – Regional Language options
      mmsys.cpl – Sounds and Audio Device Properties
      sysdm.cpl – System Properties
      nusrmgr.cpl – User Accounts
      firewall.cpl – Firewall Settings
      wscui.cpl – Security Center


      Windows Environment Commands
      %ALLUSERSPROFILE% – Open the All User’s Profile
      %HomeDrive% – Opens your home drive e.g. C:\
      %UserProfile% – Opens you User’s Profile
      %temp% Opens – temporary file Folder
      %systemroot% – Opens Windows folder

      Wupdmgr – Microsoft Windows Update

      Use Google public DNS to increase browsing speed

      Every ISP has its own DNS (Domain Name Server) but some time it response very slowly which affect your browsing speed. To increase your browsing speed you can use Google public DNS which are much faster then any other DNS server. To setup Google Public DNS follow these steps.
      Microsoft Windows
      DNS settings are specified in the TCP/IP Properties window for the selected network connection.
      Example: Changing DNS server settings on Microsoft Windows 7
      1. Go the Control Panel.
      2. Click Network and Internet, then Network and Sharing Center, and click Change adapter settings.
      3. Select the connection for which you want to configure Google Public DNS. For example:
        • To change the settings for an Ethernet connection, right-click Local Area Connection, and click Properties.
        • To change the settings for a wireless connection, right-click Wireless Network Connection, and click Properties.
      If you are prompted for an administrator password or confirmation, type the password or provide confirmation.
      1. Select the Networking tab. Under This connection uses the following items, click Internet Protocol Version 4 (TCP/IPv4), and then click Properties.
      2. Click Advanced and select the DNS tab. If there are any DNS server IP addresses listed there, write them down for future reference, and remove them from this window.
      3. Click OK.
      4. Select Use the following DNS server addresses. If there are any IP addresses listed in the Preferred DNS server or Alternate DNS server, write them down for future reference.
      5. Replace those addresses with the IP addresses of the Google DNS servers: 8.8.8.8 and 8.8.4.4.
      6. Restart the connection you selected in step 3.

      Edit Windows Registry to view hidden files

      Sometimes some notorious viruses can corrupt your windows registry. This can be really troublesome.
      These viruses will lie hidden in your computer folders. The worst is that these cannot be seen by enabling ‘Show hidden files’ in folder option. Some times it will also not allow you to change the folder options!
      Don’t think you are helpless. You can directly edit the windows registry and activate the feature: ‘Show hidden files’. This is really easy. Just follow the steps:
      1) Click on Start -> Run.
      2) Then type regedit and hit OK — It will give you options to edit the Windows registry.
      Now navigate through following path:
      HKEY_LOCAL_MACHINE –> SOFTWARE –> Microsoft –> Windows –> CurrentVersion –> Explorer –> Advanced –> Folder –> Hidden –> SHOWALL
      Here, double click and check the value of ‘CheckedValue’. Change it to 1 (base hexadecimal)
      Save you changes and you are done.
      Now you can view the hidden folders.